
CTF문제에서 다음과 같이 Dockerfile을 제공해주는 경우가 있다.
이때 만약 문제서버와 동일한 환경에서 바이너리를 실행시키며 디버깅을 하고싶을땐 어떻게 해야할까?
그래서 준비해봤다.
1. docker 파일 이용해서 해당 환경 OS 실행 (docker image생성 -> 컨테이너 생성 -> 컨테이너 접속)
2. 관련 프로그램 설치 (gdb, pwntools)
3. 바이너리가 다른 아키텍쳐(i386가 아닌)에서 컴파일 된 경우, 크로스 컴파일
(처음 실행) 도커 빌드 및 컨테이너 실행
#dockerfile 이용해 image 생성
sudo docker build -t codegatearvm:cgarvm ./
#image 이용해 컨테이너 실행
sudo docker run -i -t -d -p 9080:8080 --name arvm 3c4869872aac
#실행중인 컨테이너 접속
sudo docker exec -it arvm /bin/bash
(부팅 후 다시 실행) 도커 이미지 확인
sudo docker images
sudo docker start [up시킬 컨테이너 이름]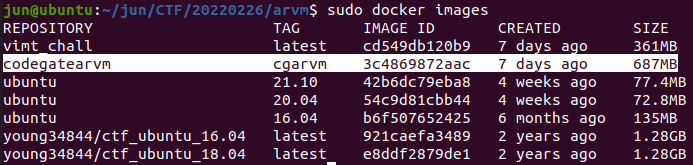
#image 이용해 컨테이너 실행
sudo docker run -i -t -d -p 9080:8080 --name arvm 3c4869872aac
도커 터미널 여러개 띄우기 : 호스트 터미널 하나 더 띄워서 exec 한번 더 하면 됨.
#실행중인 컨테이너 접속
sudo docker exec -it arvm /bin/bash
도커에 필수 프로그램 설치
(vim / python / pwntools / dbg(pwndbg))
#pwnable_conf.sh
apt update -y
apt-get update -y
apt install -y vim
apt install python -y
apt-get install python2.7-dev python3-pip -y
pip install pwntools -y
apt-get install libcapstone-dev -y
sudo apt install -y git
git clone https://github.com/pwndbg/pwndbg
cd pwndbg
./setup.sh
크로스 컴파일 (ARM) 및 gdb 디버깅
우분투에서 arm 크로스컴파일 및 디버깅
우분투에서 arm 크로스컴파일 및 디버깅 주의 : arm 종류는 굉장히 다양하고 안드로이드, ios 디바이스 등 여기에 맞게 크로스컴파일 해야함. (ELF 64-bit ARM aarch64, Mach-O 64-bit ARM aarch64 등 디바이..
nightohl.tistory.com
qemu설치
apt install -y xinetd qemu-user-static gcc-arm-linux-gnueabi8888포트로 arm QEMU 띄우기
qemu-arm-static -L /usr/arm-linux-gnueabi -g 8888 ./app
gdb-multiarch 설치
apt install gdb-multiarch
gdb-multiarch [바이너리 이름]
set arc arm
target remote localhost:8888
pwntools gdb-multiarch 디버깅
from pwn import *

#p = remote("15.165.92.159", 1234)
p = process(['qemu-arm-static','-L', '/usr/arm-linux-gnueabi', '-g', '8888', './app'])

e = ELF("./app")

pause()
다음과 같이 pwntools를 실행할때 프로세스를 띄워 여기로 디버깅할 수도 있다. 가히 혁신적이다.
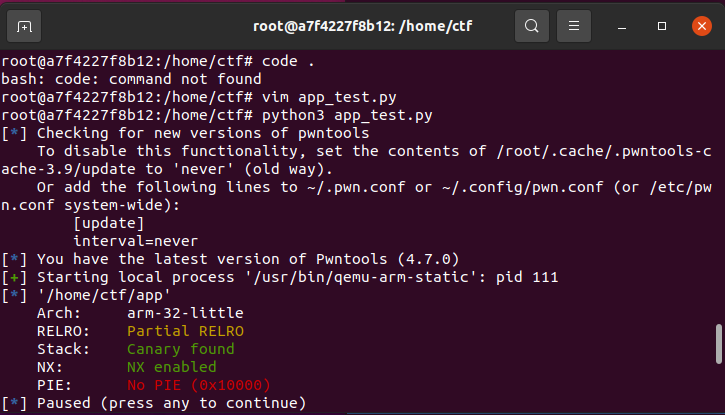
다음과 같이 실행하면 파이썬 코드가 실행되고 pause() 함수 덕에 이렇게 얌전히 기다리고있는데,
이때 gdb-multiarch를 이용해 붙어주면 된다.
gdb를 실행한 뒤, 안에서 다음 명령어를 입력해 붙을 수 있다.
target remote localhost:8888도커 안의 바이너리에 gdb 붙는 법
1. 포트 번호를 알때 : gdb 실행후 target remote ip:port
2. pid를 알때 : gdb attach -p pid
guest : os, isa, libc, libm등의 버전을 맞춰 놓은 환경
host : gdb를 갖춰놓은 환경
본래는 도커안에 프로세스를 띄워두고 host->guest로 붙는 것이 일반적인 방법인것 같은데,
필자는 귀찮아서 guest안에서 gdb 환경을 세팅하고 gdb attach 를 통해서 붙는다.

트러블 슈팅
수정 전 (오류 발생 코드) :
apt-get install python2.7-dev python-pip -y수정 후 :
apt-get install python2.7-dev python3-pip -y계속해서 무한루프가 돈다. 왜 안 죽고 무한루프가 돌까 ㅠ
E: Package 'python-pip' has no installation candidate
./setup.sh: line 7: pip: command not found
Reading package lists... Done
Building dependency tree... Done
Reading state information... Done
libcapstone-dev is already the newest version (4.0.2-3).
0 upgraded, 0 newly installed, 0 to remove and 7 not upgraded.
./setup.sh: line 9: sudo: command not found
./setup.sh: line 10: git: command not found
./setup.sh: line 11: cd: pwndbg: No such file or directory
Hit:1 http://archive.ubuntu.com/ubuntu impish InRelease
Get:2 http://security.ubuntu.com/ubuntu impish-security InRelease [110 kB]
Get:3 http://archive.ubuntu.com/ubuntu impish-updates InRelease [110 kB]
Get:4 http://archive.ubuntu.com/ubuntu impish-backports InRelease [101 kB]
Fetched 321 kB in 2s (135 kB/s)
Reading package lists... Done
Building dependency tree... Done
Reading state information... Done
7 packages can be upgraded. Run 'apt list --upgradable' to see them.
Get:1 http://security.ubuntu.com/ubuntu impish-security InRelease [110 kB]
Hit:2 http://archive.ubuntu.com/ubuntu impish InRelease
Get:3 http://archive.ubuntu.com/ubuntu impish-updates InRelease [110 kB]
Get:4 http://archive.ubuntu.com/ubuntu impish-backports InRelease [101 kB]
Fetched 321 kB in 2s (142 kB/s)
Reading package lists... Done
Reading package lists... Done
Building dependency tree... Done
Reading state information... Done
vim is already the newest version (2:8.2.2434-3ubuntu3.2).
0 upgraded, 0 newly installed, 0 to remove and 7 not upgraded.
Reading package lists... Done
Building dependency tree... Done
Reading state information... Done
Note, selecting 'python-is-python2' instead of 'python'
python-is-python2 is already the newest version (2.7.18-9).
0 upgraded, 0 newly installed, 0 to remove and 7 not upgraded.
Reading package lists... Done
Building dependency tree... Done
Reading state information... Done
Package python-pip is not available, but is referred to by another package.
This may mean that the package is missing, has been obsoleted, or
is only available from another source
However the following packages replace it:
  python3-pip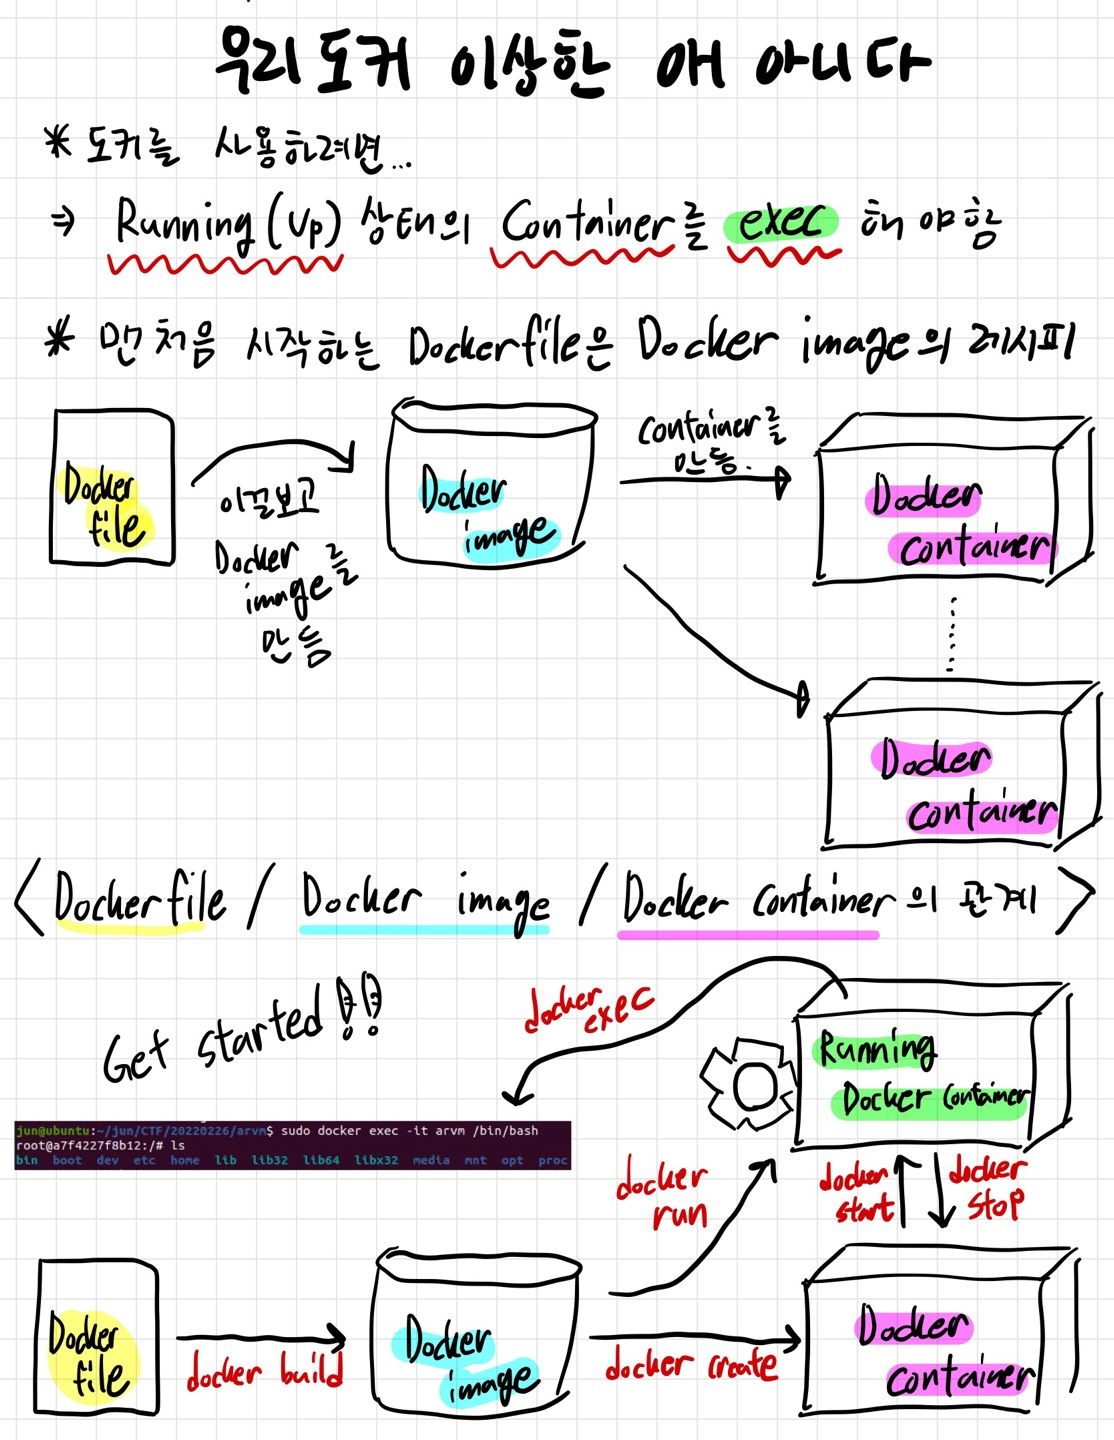
# Copyright 2020 Google LLC
#
# Licensed under the Apache License, Version 2.0 (the "License");
# you may not use this file except in compliance with the License.
# You may obtain a copy of the License at
#
#     https://www.apache.org/licenses/LICENSE-2.0
#
# Unless required by applicable law or agreed to in writing, software
# distributed under the License is distributed on an "AS IS" BASIS,
# WITHOUT WARRANTIES OR CONDITIONS OF ANY KIND, either express or implied.
# See the License for the specific language governing permissions and
# limitations under the License.
FROM ubuntu:22.04

RUN /usr/sbin/useradd --no-create-home -u 1000 user

RUN apt-get update && apt-get install -y qemu-system-arm

COPY chal.elf /home/user/
COPY run.sh /home/user/

CMD ["bash",  "-c", "cd /home/user && /home/user/run.sh"]

ARG DEBIAN_FRONTEND=noninteractive

ENV TZ Asia/Seoul
ENV PYTHONIOENCODING UTF-8
ENV LC_CTYPE C.UTF-8

WORKDIR /root

RUN apt update && apt install -y netcat
RUN apt install vim git gcc ssh curl wget gdb sudo zsh python3 python3-pip libffi-dev build-essential libssl-dev libc6-i386 libc6-dbg gcc-multilib make -y

RUN dpkg --add-architecture i386
RUN apt update
RUN apt install libc6:i386 -y

RUN python3 -m pip install --upgrade pip
RUN pip3 install unicorn
RUN pip3 install keystone-engine
RUN pip3 install pwntools
RUN pip3 install ropgadget
RUN apt install libcapstone-dev -y

RUN git clone https://github.com/hugsy/gef ./gef
RUN echo source ~/gef/gef.py >> ~/.gdbinit

RUN apt install ruby-full -y
RUN gem install one_gadget seccomp-tools

RUN wget https://github.com/robbyrussell/oh-my-zsh/raw/master/tools/install.sh -O - | zsh || true
RUN mkdir -p "$HOME/.zsh"
RUN git clone https://github.com/sindresorhus/pure.git "$HOME/.zsh/pure"
RUN echo "fpath+=("$HOME/.zsh/pure")\nautoload -U promptinit; promptinit\nprompt pure" >> ~/.zshrc

RUN git clone https://github.com/zsh-users/zsh-syntax-highlighting.git
RUN echo "source ./zsh-syntax-highlighting/zsh-syntax-highlighting.zsh" >> ~/.zshrc

RUN git clone https://github.com/zsh-users/zsh-autosuggestions ~/.zsh/zsh-autosuggestions
RUN echo "source ~/.zsh/zsh-autosuggestions/zsh-autosuggestions.zsh" >> ~/.zshrc
RUN echo "ZSH_AUTOSUGGEST_HIGHLIGHT_STYLE='fg=111'" >> ~/.zshrc
https://sechack.tistory.com/57
Docker를 이용한 pwnable환경 세팅
처음 pwnable을 공부하시는 분들이면 대부분 vmware를 이용해서 우분투 환경을 세팅할것이다. 하지만 vmware특성상 무겁기도 하고 단순한 실습을 넘어서 CTF를 하실 분들이라면 pwnable특성상 ubuntu버전
sechack.tistory.com
'CTF > CTF_Configuration' 카테고리의 다른 글
| CTF 문제 풀기 시작할때 해야하는 것들 정리 (0) | 2022.03.19 |
|---|---|
| CTF pwnable 환경구성을 위한 쉘코드 (pwnable_conf.sh) (0) | 2022.02.27 |
| 바이너리에 ld와 libc 새로 링킹하기 (D_PRELOAD=./libc.so.6 segfault 뜰때 해결하기) (0) | 2022.02.19 |
| CTF-pwnable용 Docker 설치 및 사용법 (0) | 2022.02.16 |
| main_arena offset 구하기 (0) | 2022.02.09 |